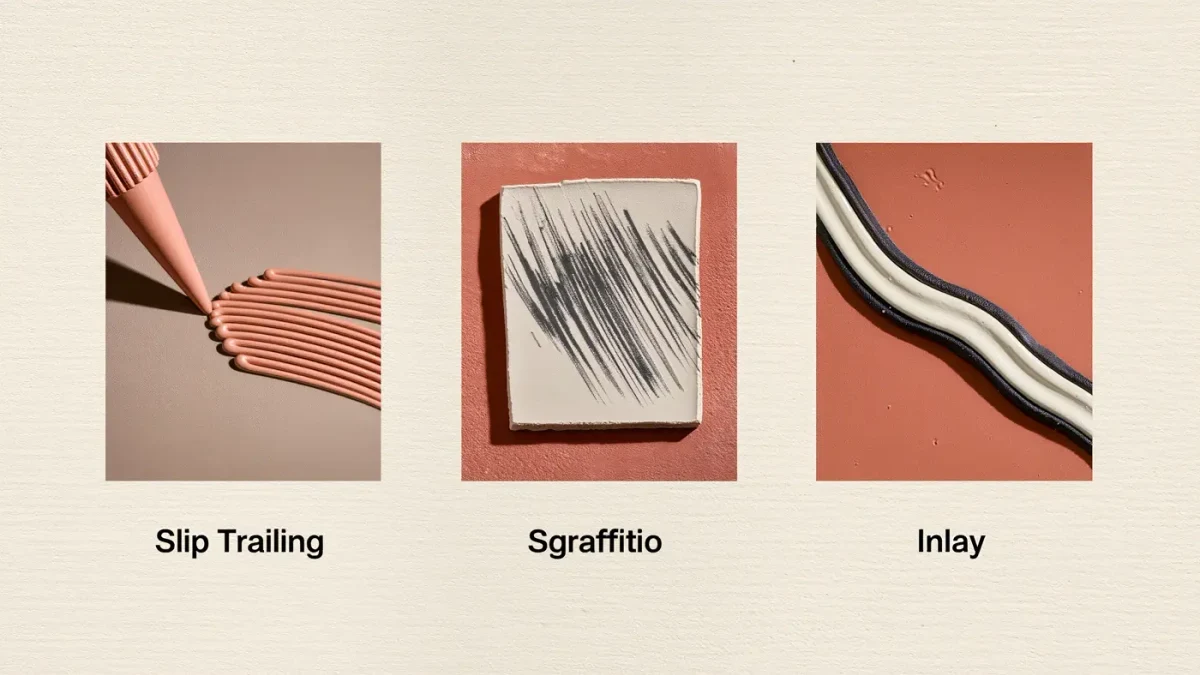
Slip decoration techniques meet clay at the leather-hard stage — firm enough to handle, damp enough to bond. Slip is the same clay thinned with water to double cream: trailed from a nozzle it draws raised lines, brushed as a coat it invites scratching, pressed into incisions it becomes inlay. A pot reaches it twelve to twenty-four hours after throwing.
What is slip, and what does leather-hard mean?
Slip is clay and water, nothing more, sieved smooth and often tinted with metallic oxides or commercial stains. Because it is the same material as the pot in a liquid state, it shrinks with the pot in the kiln instead of flaking away — which is why potters mix decorating slip from their own clay body wherever possible.
Leather-hard is the clay state between wet and dry: the pot holds its shape, feels cool and slightly damp, and takes a thumbnail dent without the nail coming away muddy. At this point clay is strong enough to carry decoration and still open enough for slip to key into the surface. Decorate much wetter and the slip peels; much drier and it refuses to bond. tutorials coverage.
Colourants deserve their own note. Metallic oxides — iron, cobalt, copper, manganese — form the traditional palette, earthy and reliably stable in the kiln, while commercial stains broaden the range towards brighter, cleaner hues at a cost in price rather than performance. Both tint the same slip body, and both belong in test-tile quantities until their fired colours are familiar.
All three techniques below have long, deep lineages — English slipware trailing, sgraffito across Europe and the Islamic world, inlaid slip in Korean and Japanese ceramics — and examples of each tradition are held in the Smithsonian's open-access archive.
What tools does slip work need?
Modest tools, a steady afternoon:
- About 500ml of decorating slip mixed from your own clay body, sieved smooth
- One or two slip bottles with fine nozzles
- Two or three soft brushes for laying coats
- A sgraffito loop tool, a craft knife and a potter's needle for incising
- A metal rib or scraper for levelling inlay
- A natural sponge and a board for resting work
- Plastic sheeting to control drying, and stains or oxides for colour
- A turntable, if one is to hand, for decorating round pots
Related stories: Wheel throwing for beginners begins with centring, opening and pulling · Cut-paper collage techniques begin with Matisse's late cut-outs.
How do you trail, scratch and inlay?
- Sieve the slip until it pours like double cream, and tint portions with stain or oxide. Test every mixture on a scrap tile that fires alongside the work — slip colours read differently raw and fired.
- For trailing: fill the bottle, test the flow on paper, then draw steady lines onto the leather-hard surface, keeping the nozzle just above the clay and turning the pot rather than reaching around it. Work at an even pace; the line thickness follows the pressure.
- For sgraffito: brush an even coat of contrasting slip over the leather-hard surface — two thin coats beat one thick — and let it lose its wet sheen. Then scratch drawings through the coat with a loop tool or the corner of a knife, revealing the body colour beneath as the line.
- For inlay: incise lines into plain leather-hard clay with a needle or knife, then brush contrasting slip into the cuts until they sit level-full. Wipe the surplus gently from the surface with a barely damp sponge.
- Wait. The inlaid slip must return to leather-hard before the next step — overnight under loose plastic is usually right — or the scraper will drag the soft slip through the lines it should be revealing.
- Scrape the inlaid surface back with a metal rib held at a low angle, shaving the skin of surplus slip away until the contrasting colour survives only inside the incisions, crisp against the body.
- Let the pots dry slowly under plastic to reduce cracking, then bisque-fire around 1,000°C. The matched shrinkage of slip and body carries the decoration intact through the kiln.
Which slip mistakes crack or blur?
Thickness fails most often: slip laid on too thick shrinks more than the pot beneath it and flakes away in curls, while slip thinned to milk refuses to hold a trailed line at all. Aim for double cream, and build coats rather than layers of paint. Applying slip at mismatched dryness — wet slip on near-bone-dry clay — fails the same way, since the surfaces shrink apart as they dry.
Drying and firing add their own cautions. Decorated work should dry no faster than plain work — the slipped surface is slightly more prone to cracking during rapid drying, so keep pots loosely covered in the early days. And the bisque will not rescue a weak design; the kiln sets colours and hardens surfaces, but the drawing must be right before it goes in.
The timing faults are quieter. Sgraffito scratched while the coat is still glossy drags and smears instead of leaving a clean line; inlay scraped before it returns to leather-hard smears in the same manner, undoing hours of incising in one pass. When in doubt, wait an hour longer than feels necessary — clay rewards patience more than almost any other material.
Together the three techniques cover raised line, drawn surface and inlaid pattern: a complete decorating vocabulary built on one humble material and one forgiving window of time. Potters rarely stop at one technique — a trailed rim over an inlaid panel, sgraffito cutting through a trailed coat — and the combinations arrive on their own once the three basics feel comfortable.